Interactive Analysis on MMCloud
Note: there is a firewall issue on our departmental HPC, so we can not login to float on HPC. Please use your laptop or desktop to run the float commands.
Interactive jobs allow users to interact with the job through an IDE in an internet browser. Here, you can access data via mounted buckets and run commands in real-time through JupyterLab, RStudio, VS Code, or shell environment (tmate).
Always ensure you have obtained the latest version of required scripts in the src/ folder of this repository. You can git clone the repo to get all files. Keep these files in the same folder when running commands: mm_interactive.sh, mm_interactive.sh, host_init.sh, and bind_mount.sh.
Interactive Job Modes
For a user wanting to submit an interactive job, mm_interactive.sh, as a wrapper for mm_jobman.sh, offers three modes to choose from, depending on your use case:
--oem-packages- Allows the user to access shared packages (installed by the admin). The user will not have any user-installed packages initially. Use-installed packages, if any, will be saved in the VM, which means it will not be accessible once the VM is gone.
- NOTE: It is recommend to add an
-ivs ##to your submission command when running this mode. This is because the default space in the job is 6GB. Since this mode does not write to the EFS directly, the 6GB may be used up quickly when installing your own packages/opening your own jupyter notebooks.
--mount-packages- Allows the user to access user-installed packages, but not shared packages. Installed packages will be saved to the user directory and EFS, meaning the user can access the user packages after the initial VM is gone.
--oem-packagesand--mount-packagestogether- Allow the user to access shared and user-installed packages. Installed packages will be saved to the user directory and EFS, meaning the user can access the user packages after the initial VM is gone.
The same applies to mm_batch.sh which is also a wrapper for mm_jobman.sh.
Use Pre-configured Interactive Sessions
JupyterLab
To start JupyterLab:
mm_interactive.sh -ide jupyter --float-executable float.darwin_arm64 --oem-packages
where --float-executable is the shell command name for your float software. It defaults to float, so if you are running on a Linux system, you do not need to specify it. You can overwrite it with what’s in fact installed on your system. See this page for details.
By default, no directory on S3 are mounted to the VM. Use --mount and --mountOpt for custom mounts to access your files. We recommend the following to StatFunGen lab members:
mm_interactive.sh -ide jupyter --float-executable float.darwin_arm64 \
             --oem-packages --mount-packages \
             --mount statfungen/ftp_fgc_xqtl:/home/user/data statfungen/ftp_fgc_xqtl/interactive_sessions/<user_name>:/home/user/project --mountOpt mode=r mode=rw
where user_name is your own project folder under ftp_fgc_xqtl/interactive_sessions.
After a few minutes, you’ll see a URL to access JupyterLab. Example:
To access the server, copy this URL into a browser: http://3.89.222.63:10089/lab?token=efe44d238df52e7c35be2ffe8b87fa00263f82b48878d7b8
The gateway IP address (e.g., 3.89.222.63:10089) remains fixed for your job. The token is required for access - sharing just the URL won’t allow others to access your session.
RStudio Server
To start RStudio:
mm_interactive.sh -ide rstudio --float-executable float.darwin_arm64 --oem-packages
After a few minutes, you’ll see the message: To access RStudio Server, navigate to ... Follow the instructions to access RStudio. Other parameters and customizations follow from the same as JupterLab.
VS Code
To start VS Code:
mm_interactive.sh -ide vscode --float-executable float.darwin_arm64 --oem-packages
Note: If you lose the URL, check <JOB_ID>_<IDE>.log in the directory where you ran this command.
Use Customized Interactive Sessions
If our preconfigured interactive sessions do not contain the software program you need, you may want to build your customized interactive analysis environment so you can add software to it.
First Time Setup
For first-time setup, you’ll need to install your own packages using tmate. Run:
mm_interactive.sh -ide tmate --float-executable float.darwin_arm64 --oem-packages --mount-packages
When prompted, input your account details. A connection to the interactive session will be established. You will see:
NOTICE: tmate sessions are primarily designed for initial package configuration.
For regular development work, we recommend utilizing a more advanced Integrated Development Environment (IDE)
via the -ide option, if you have previously set up an alternative IDE.
Do you wish to proceed with the tmate session? (y/N): y
A few minutes later, you should see either:
To access the server, copy this URL into a browser: ...
or
SSH session: ...
Copy the URL into your web browser or the SSH session into your terminal.
Upon accessing the tmate session, install packages by running:
curl -fsSL https://raw.githubusercontent.com/gaow/misc/master/bash/pixi/pixi-setup.sh | bash
Once initial setup completes (40-50 minutes), you’re ready to run interactive jobs using your customized setup. Cancel the VM instance at MMCloud OpCenter.
Then, follow the instructions in the previous section to start your interactive session. But please add --mount-packages to the command in order to access packages that you installed on your own.
Additional Software Installation
To add new conda packages to your customized session, follow recommendations here.
Purging Previous Installations to Reinstall
To remove previous installations:
cd /mnt/efs/$YOUR_USER_NAME
rm -rf ~/.mamba ~/.conda ~/.anaconda ~/.pixi ~/.jupyter
It is recommended you ask an admin user to help clear the directory for you.
Using GitHub on AWS S3 with ghq
We use ghq for consistent GitHub repo management (installed as go-ghq) because standard git pull does not work reliably on AWS S3.
If missing, install with:
pixi global install go-ghq
Usage:
- Navigate to ghq directory:
cd ~/ghq - Clone the repository:
ghq get https://github.com/user/repo - Use standard git commands (pull, commit, push) to manage the repo
Managing Interactive Jobs
Status
Please refer to this section for a quick overview of Opcenter GUI to track job status.
Suspension
Conserve resources by suspending inactive sessions:
- Use the provided suspend feature in
mm_interactive.sh:--idle. Default is 2 hrs for JupyterLab sessions. - Use OpCenter GUI (find job via Job ID)
To reconnect, use the original URL saved in <jobID>_<IDE>.log in the same folder where you ran the job. Example: pu2zb2h51qpuqcmuy8ke0_jupyter.log
Jupyter Auto-Suspension:
- Suspends after 2 hours idle or 30 minutes without opened notebook
- Terminal activity doesn’t count against idle time
- Track development progress here
Migration
If you need to migrate your session to a different specifications — such as with a larger cpu and memory when you run out of memory — use the migration option.
Two ways to migrate to different specifications:
- Via instance interface:
- Click blue button in upper right (see image)
- Select new CPU/memory settings
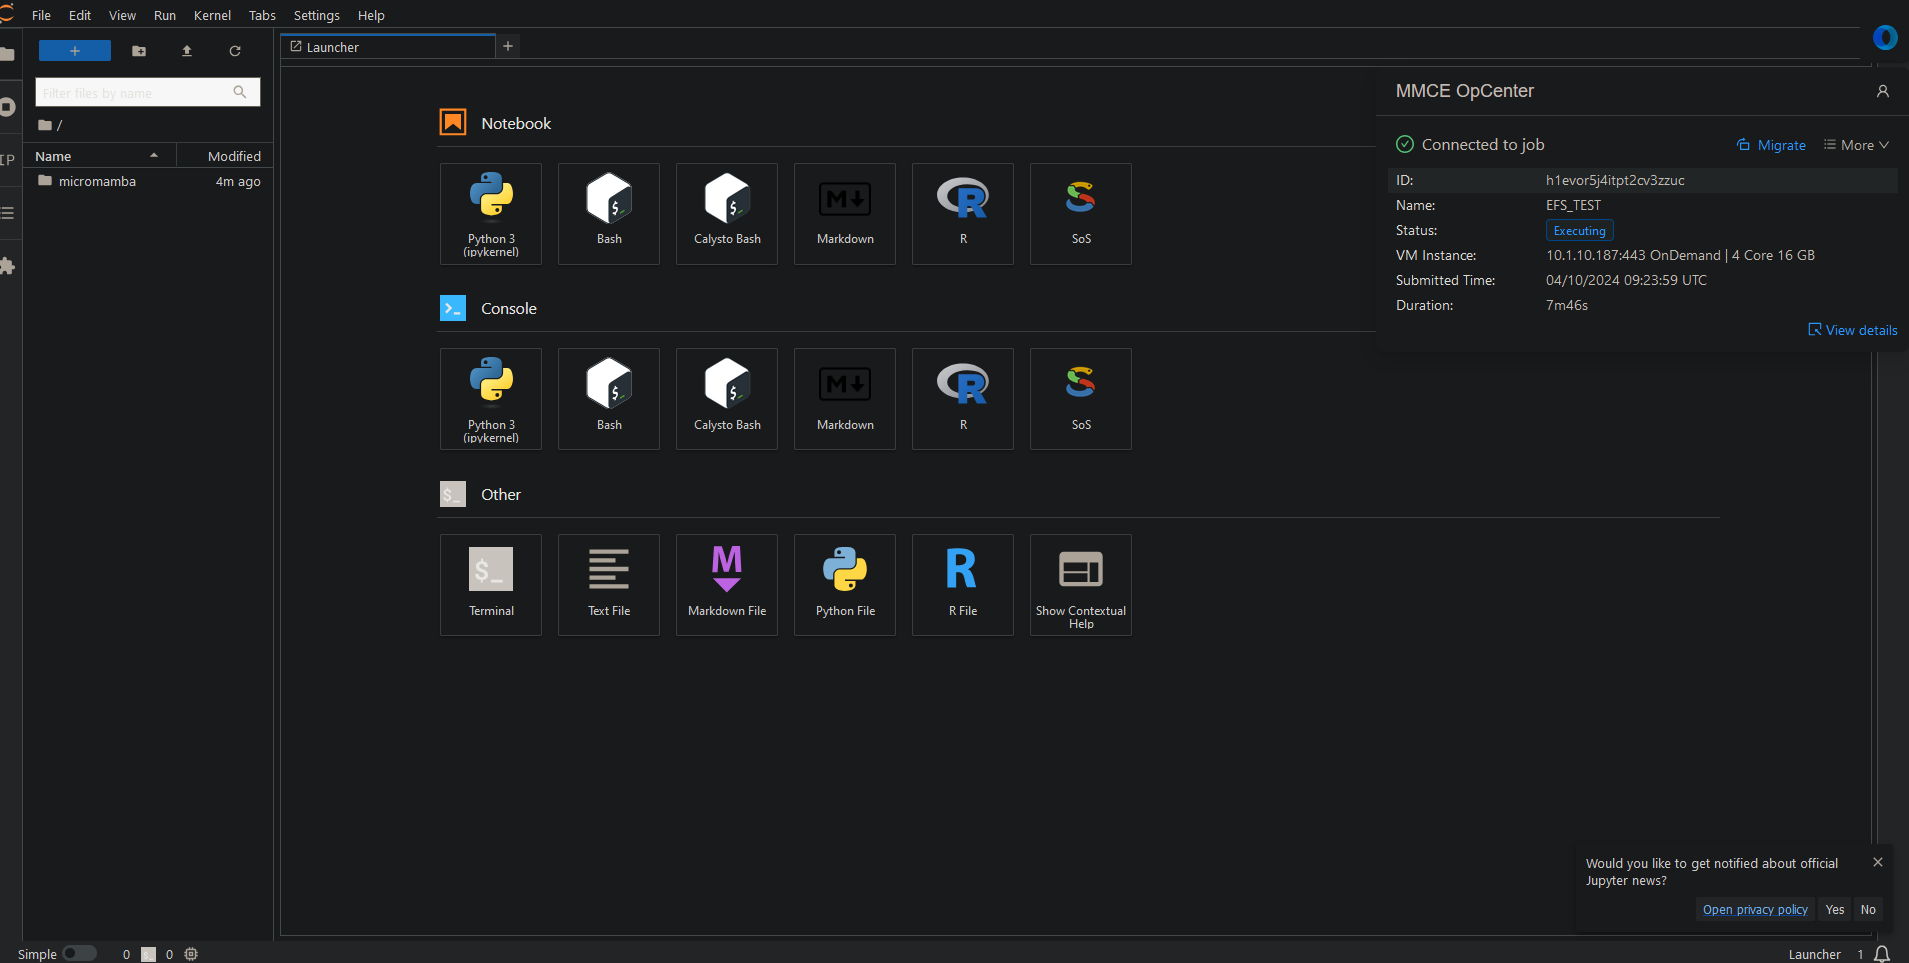
- Via OpCenter GUI:
- Click “Migrate” in top right

- Click “Migrate” in top right
Troubleshooting
IDE crashes
Out-of-Memory(OOM) Error
If you see Invalid response: 502 Bad Gateway:
- Check Wave Watcher in MMcloud GUI
- Look for memory usage (blue line) + swap (purple line) reaching limit
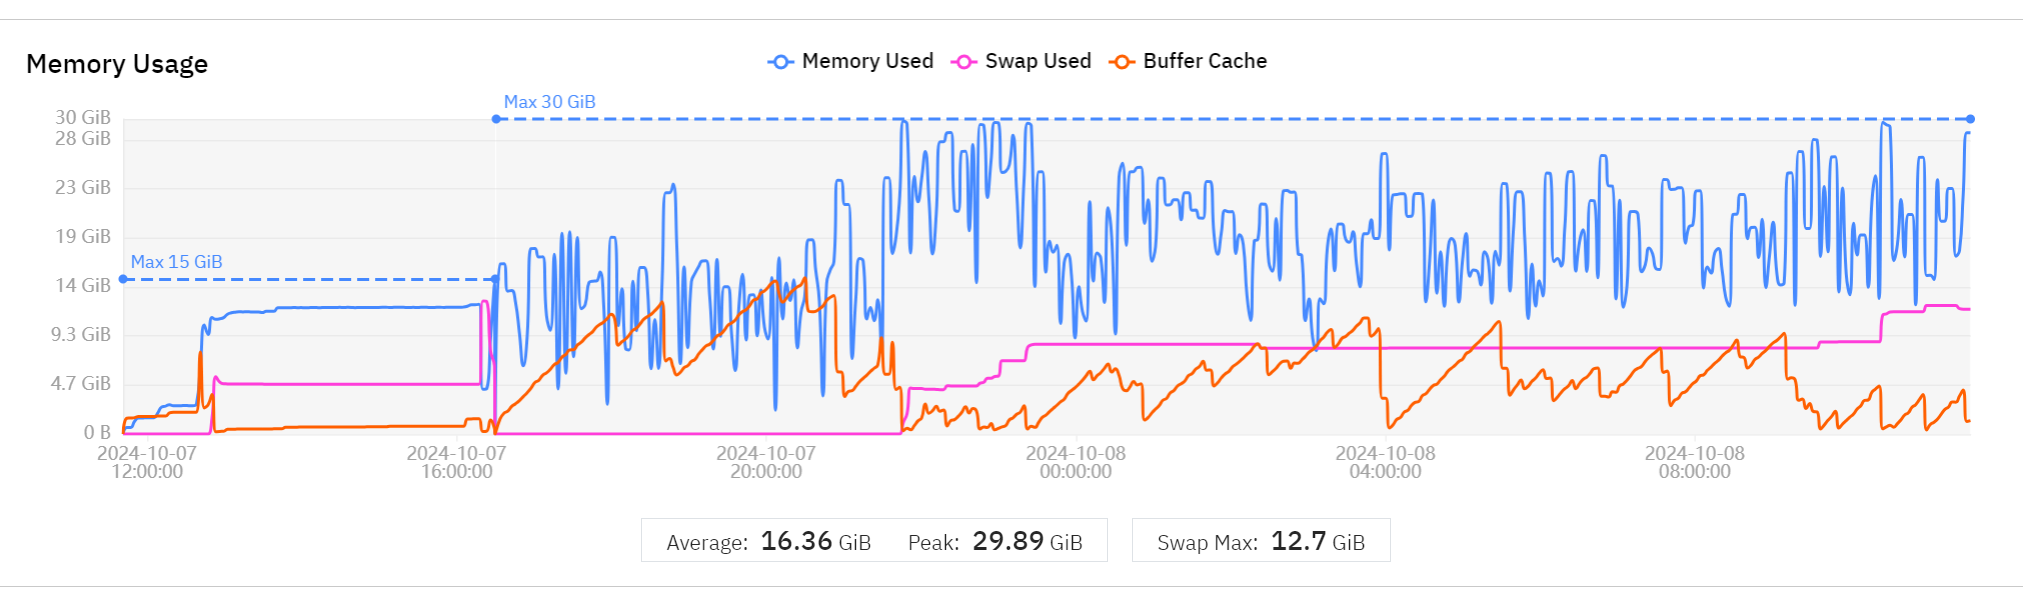
Solution: Request more memory, for example 4 cores and 32GB (default is 16GB):
mm_interactive.sh -ide jupyter --float-executable float.darwin_arm64 --mount-packages --oem-packages -c 4 -m 32
Out of Space Error
If you encounter disk space errors during package installation:
- Add
-ivs 20parameter to increase container volume - Only needed during package installation
Fatal Code Issues
For Kernel died/aborted/interrupted/killed/restarting:
- Check
stderr.autosavein OpCenter GUI - Search for
error,Error,ERROR - Look for
AsyncIOLoopKernelRestarter: restarting kernel (1/5) - Fix problematic code
Known Jupyter Issues
R Kernel Problems
- NULL cwd: try restart R kernel by switching to other kernel and back to R kernel on the right top corner of the Notebook.
- Missing R kernel: Run
IRkernel::installspec()in R terminal- Details: GitHub issue #113
General Issues
Freeze Behavior
If terminal freezes:
- Close and reopen terminal to recover. This typically won’t affect ongoing analyses in your Notebook.
- Note timestamp (
hh:mm:ss) when the freeze happens (usetimecommand), report this along with job ID to #mmcloud-debug slack channel to help the engineers to figure out what’s going on.